Friday, July 11, 2014

Now I know my ABC's...?

If you have ever read the "About" section on this blog, you will know that I started Alphabake as a personal quest to make better use of my collection of cook books.  In three years and seven months I have FINALLY baked my way through the alphabet.  Alphabake took me on a journey around the world as I attempted to improve my culinary and photography skills. I am really lucky that I got to do a lot of travelling these past few years and I really enjoyed filling my baking void on the blog with pictures from my adventures abroad.

Links to all of my previous entries can be found in the "Recipes" and "Travel Posts" sections.  For those of you who are just starting to get introduced to this project, here are some of my favourite posts from earlier on:

 EBELSKIVERS EDINBURGH ORANGE POPPY SEED CAKEBOLIVIA MACARONS LISBON CHOCOLATE MOUSSE CUPCAKES THE NETHERLANDS RED VELVET WHOOPIE PIES

I have certainly taken my sweet time with putting up my first round of alphabetical posts, and in that time there have been many people who have been very supportive who I must thank:

1) All the roommates I have had during this process, thank you for being so cool with me occasionally hijacking the kitchen and for saying such nice things about the food I made

2) The people who had me as their house guest (Mum, Sarah and her mother, and the Harveys), who were so kind as to let me use their kitchens for blogging purposes

3) Mike for all of your technical assistance

4) Phil and Victor for teaching me as much as they could about photography during my short stint in San Francisco

5) AND EVERYONE who has taken the time over the last few years to check out and comment on the blog

THANK YOU! THANK YOU! THANK YOU!!!

This is in no way the end of Alphabake.  The alphabet will be repeated!  There are a few new ideas I would like to try out on here in the future.  One thing I would like to start doing right away is use my ice cream maker more and experiment with making the frozen dessert while it is still summer.  If you have any flavour ideas you are curious about, leave me a comment below and I will see if I can turn them into something cold and tasty. If you have any other general thoughts about the blog, I would love to hear about those too!

Thank you again!

- Louise 

Wednesday, July 9, 2014

Z: (Stuffed) Zucchini


Here we are, folks!  After about three and a half years on the Alphabake train, we have finally arrived at letter "Z". What a culinary journey it has been!

For the final pick I decided to go with this stuffed zucchini recipe from Plenty: Vibrant Recipes from London's Ottolenghi by Yotam Ottolenghi.  I have not whipped up too many savoury recipes on the blog so this made for a nice change. It was also such a breeze to prepare compared to the yogurt bread I made for the previous food entry.

These stuffed zucchinis would make a lovely little starter or an accompaniment with a main. There were some great flavours in this dish; the kitchen smelled amazing.  The recipe said that the rice should be "al dente" and that was the result I got.  My two taste testers and I were not entirely pleased with the slightly crunchy texture of the rice filling.  The rice is supposed to get "cooked" while it is inside the zucchini and steaming the zucchini any longer than what the recipe calls for would make it mushy and not very nice to serve up.  If you would like to try this recipe and want to have a softer rice filling, I would cook it a bit, but not fully, before scooping it into the zucchini "boats".

I made this recipe and took the photos while I was staying in San Francisco in early March of this year.  At the time I was working with local commercial photographer, Philip Harvey.  Due to this, I had the exciting opportunity to shoot the final results from this recipe in his professional photography studio.  I have to send a big shout out to Phil's intern at the time, Victor Tseng, for helping me out with the equipment and a lot of the setup for this shoot.  I learned a lot in that session and I am really happy with the photos we got from it.

Wednesday, April 9, 2014

Y: Yogurt, Apple, Rye and Cinnamon Loaf


For letter "Y" of my alphabetical baking challenge I decided to try and make the Yogurt, Apple, Rye and Cinnamon Loaf from the Bourke Street Bakery: The Ultimate Baking Companion by Paul Allam and David McGuinness.  In the process of completing the recipe, rather than "Y", all I was really thinking was, "WHHHHYYYY?!?!?"

This was one of the most challenging and frustrating  recipes I have ever tried to make on Alphabake. It comes from a wonderful book but there were some fairly detailed and complicated instructions involved for this bread that had not been adapted for the home baker. As a result, I had to make quite a few adjustments that possibly compromised the flavour of the bread.  Here are some of the challenges I faced:

i) The recipe directs you to a different page in the book that has lengthy instructions on how to make a "white bread starter". Starters are always used for sourdough breads and often for white breads in order to give them a nicer, more distinct flavour and to help increase their longevity.  It is a dough you create with equal amounts of flour and water which you allow to sit for a period of time (the length depending on the type of starter you are making), allowing it to ferment. It was not until I was just about to start baking that I thoroughly read through the starter recipe that was provided and realized that it took about ONE MONTH to make. It gave steps on how to help your starter grow over 5 days, and then this process would be repeated several times. That technique would create a lot of starter dough, an amount more appropriate for a commercial bakery, that you would continue to feed and use over a long period of time.  The technique the book uses is not useful for the home baker just looking to make one or two loaves.

Still determined to make the bread despite this lengthy obstacle, I did my research and found a recipe for a different kind of bread starter called a "biga" that is used more in Italian baking and only takes approximately a day to grow. In my instructions I included the link to a biga starter recipe instead of the one written in the book.  The amount of active dry yeast is so small so a kitchen scale HAS to be used for precision.

ii) I could not find rye flour so I reluctantly substituted it with whole wheat flour which I think compromised achieving the intended flavour. I also could not find fresh yeast so I used active dry yeast instead.

iii) There were so many steps involved in this recipe. I would have to do something with the dough and then let it sit for a certain amount of time, and then do something else with it, and let it sit some more. It was very time consuming and I was up very late that night.


Results:
The biga starter recipe seemed to work well. After sitting for over 24-hours it was very active and bubbly. I only needed to use a fraction of it for the bread recipe. After baking, I had a loaf of bread decent, with a very good consistency. I was supposed to tap the bottom of the loaf when I took it out of the oven and it made a lovely hollow sound like it was supposed to. It was the most satisfying moment in the whole stressful process. Unfortunately, The apple chunks in the bread took on the flavour of the yeast which was not too pleasant. I think the bread also would have tasted much better if I was able to use rye flour.

To conclude, I do not plan to ever try this recipe out again although I am glad I finally got introduced to the many challenges of bread making.  I was not sure if I wanted to post this recipe up on the blog because it felt like such a failure.  I cringe every time I think of the night I attempted to make it. Nonetheless, the whole point of the blog is to document my culinary journey, including the ups and the downs.

Saturday, January 18, 2014

X: Xmas Cookies


Happy New Year everyone! 2014 is getting off to a good start but, judging by this post, part of my mind is still a bit stuck in 2013, thinking about holiday baking.  Since I was still having 'X-mas' cookie cravings after December 25th, it seemed like the perfect focus for this blog entry. When I first started up Alphabake, my original baking idea for 'X' was hot x'd (crossed) buns.  As they are a typical Easter treat it would have been a post that was quite out of season (more so than this one) and a bit more of  a stretch with the use of the letter 'X'.

Feeling celebratory, I have included three different cookie recipes, all appropriate for the holidays or any other time of the year. I have featured:

- Coconut Macadamia Triangles from The William-Sonoma Baking Book
- Cashew Caramel Cookies from Martha Stewart's Cookies
- Chocolate-Coconut Bars from www.marthastewart.com

All were delicious and fairly simple to make--it was hard to pick a favourite! Happy baking!

Sunday, November 17, 2013

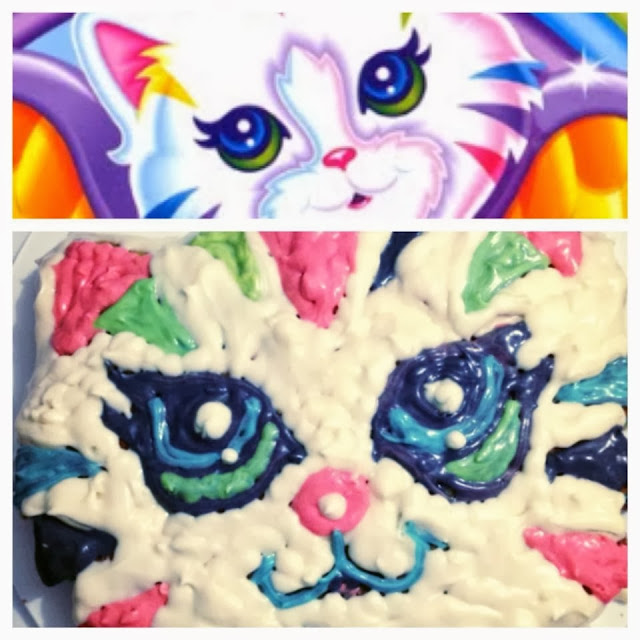
Cat Cakes: Lisa Frank Inspired


Cat Cakes are back!!!

If you were a young girl growing up in the early 90's, you might remember school supplies and Valentines Day cards that were covered in designs by Lisa Frank.  For those unfamiliar with the brand, think of psychedelic scenes consisting of technicolour animals.  A young Mila Kunis was in their ad campaigns and it should also be noted that the designs were not just sported by trendy little girls.

I have some friends who understand my nostalgic fascination with Lisa Frank and they have been known to surprise me with colouring books and stickers from the brand. As a token of my appreciation, I made them a Lisa Frank-inspired cat cake for their joint birthday.

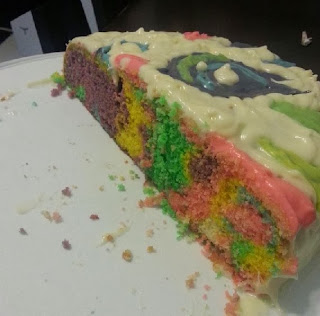
The Lisa Frank cat was a lemon cake (a little sour puss!) topped with a cream cheese icing. I could not find the flaky cream cheese icing recipe that I used for the Arthur Cat Cake.  This was too bad because it was great for piping.  The icing recipe I did use turned out to be fairly wet but ultimately I was able to get the basic design I wanted. I can't forget to mention that in typical Lisa Frank fashion, this cat cake was full of rainbows on the inside!!!


Thursday, November 7, 2013

W: White Chocolate Trifle with Spiced Pears


I made this white chocolate trifle from Bon Appetit Desserts by Barbara Fairchild for Christmas Eve last year. If you are going to be the one in charge of making a dessert for a party this coming holiday season, perhaps this is the recipe for you! With the richness of the cream and white chocolate as well as the seasonal spices used in poaching the pears, this makes an appropriate, comforting treat for the cozier winter months. It includes several more expensive ingredients such as white chocolate, mascarpone, and vanilla bean so I would save it for a special occasion. It also has a large serving yield, so its great to share with a big group; we had a lot leftover!

Here are my cooking notes for this recipe:
i) Make sure you use GOOD quality white chocolate. The recipe called for this (Lindt was an example). I happened to be one-stop-shopping and just used what they had at the store I was in...I think it was Baker's chocolate which wasn't as good a quality and resulted in a slightly grainy trifle cream. 
ii) I could not find any pear brandy at the liquor store. I ended up using regular brandy instead and put in a little less than what the recipe calls for for fear of compromising the flavour.
iii) Before reading this recipe, I had never heard of pear nectar. It was surprisingly easy to find in the grocery store and was made by an Italian producer. 

 There are a lot of steps to this recipe although it does allow you to prepare steps ahead of time for your convenience. Making this trifle felt like quite a laborious activity with mediocre results (in my experience), but I must say that when I was poaching the pears in all of the spices, my kitchen had never smelled so good!