Showing posts with label Cakes. Show all posts

Tuesday, September 30, 2014

A: Apple Cake


Ding, ding, ding! Round two!!!

I am very excited to start alphabetically baking my way through twenty-six new recipes!  Once again, 'A' is for apple.  I really love this apple cake recipe from Recipes and Dreams from an Italian Life by Tessa Kiros.  It results in a very dense, moist and not overly sweet dessert.  Not only is it tasty but, with its rose petal top, it is a visual showstopper.  You can have it with afternoon tea, for dessert served with fresh berries and ice cream, or even for breakfast as I did with my family.

This was the second time within a year that I made this recipe. I first tried it at home in Toronto for my mother's birthday. It was a hit. The pictures I have featured in this post are from when I made it during my recent stay in San Francisco.  Making the recipe in two different countries meant that I needed to alter a couple of my ingredients which lead to slightly different results----all positive though.

One interesting ingredient which I believe strongly attributes to the smooth texture of the cake is the potato flour. It is a product that I had never heard of prior to making this recipe. I had a bit of trouble tracking it down in Toronto. I went to several grocery stores and small health food shops in my neighbourhood and eventually tracked it down at Essence of Life Organics in Kensington Market.  When in San Francisco, I braced myself for another long search for the mysterious potato flour.  I called up three different stores within close proximity to one another and they all had it in stock! I ended up purchasing a flour by Bob's Red Mill.  BRM is a popular brand here in Toronto but none of the shops in my area that sold BRM products had their potato flour. Maybe that will change. If you have concerns about making this recipe because it requires you to buy this flour that you think you will probably never use again, it can be used for making breads, waffles, gluten-free baking, and a thickener for sauces and soups.

The original recipe calls for Rennet/Reinette apples which is a variety that I was also not familiar with prior but it is apparently a sweeter, larger cooking apple.  I was not able to find this variety for both of my baking attempts so in Toronto I settled for a mix of Cortland and Royal Gala apples and in San Francisco I used Pink Lady apples. Both times I found that I needed more than the suggested 3 apples so I would buy a couple extra just in case.

The cake looked a little different the two times I made it because in Toronto I did not peel the apples like the  recipe calls for you to do whereas in San Francisco I did.  With the peel left on, the cake certainly looked more floral and delicate.  I have put a photo of that attempt towards the end of this post. Without the peel, the cake topping had a softer texture which I found more enjoyable to eat. Depending on the results you would like to achieve you could go either way with the peel.

Since I baked and photographed this cake during my stay in San Francisco last March, I have to give another shout out to Phil for letting me use his studio and equipment, and to Victor for all of his assistance during the shoot.  Also, many thanks to the Harvey family for letting me use their kitchen. I ended up baking quite late into the night...

Sunday, November 17, 2013

Cat Cakes: Lisa Frank Inspired


Cat Cakes are back!!!

If you were a young girl growing up in the early 90's, you might remember school supplies and Valentines Day cards that were covered in designs by Lisa Frank.  For those unfamiliar with the brand, think of psychedelic scenes consisting of technicolour animals.  A young Mila Kunis was in their ad campaigns and it should also be noted that the designs were not just sported by trendy little girls.

I have some friends who understand my nostalgic fascination with Lisa Frank and they have been known to surprise me with colouring books and stickers from the brand. As a token of my appreciation, I made them a Lisa Frank-inspired cat cake for their joint birthday.

The Lisa Frank cat was a lemon cake (a little sour puss!) topped with a cream cheese icing. I could not find the flaky cream cheese icing recipe that I used for the Arthur Cat Cake.  This was too bad because it was great for piping.  The icing recipe I did use turned out to be fairly wet but ultimately I was able to get the basic design I wanted. I can't forget to mention that in typical Lisa Frank fashion, this cat cake was full of rainbows on the inside!!!


Thursday, November 7, 2013

W: White Chocolate Trifle with Spiced Pears


I made this white chocolate trifle from Bon Appetit Desserts by Barbara Fairchild for Christmas Eve last year. If you are going to be the one in charge of making a dessert for a party this coming holiday season, perhaps this is the recipe for you! With the richness of the cream and white chocolate as well as the seasonal spices used in poaching the pears, this makes an appropriate, comforting treat for the cozier winter months. It includes several more expensive ingredients such as white chocolate, mascarpone, and vanilla bean so I would save it for a special occasion. It also has a large serving yield, so its great to share with a big group; we had a lot leftover!

Here are my cooking notes for this recipe:
i) Make sure you use GOOD quality white chocolate. The recipe called for this (Lindt was an example). I happened to be one-stop-shopping and just used what they had at the store I was in...I think it was Baker's chocolate which wasn't as good a quality and resulted in a slightly grainy trifle cream. 
ii) I could not find any pear brandy at the liquor store. I ended up using regular brandy instead and put in a little less than what the recipe calls for for fear of compromising the flavour.
iii) Before reading this recipe, I had never heard of pear nectar. It was surprisingly easy to find in the grocery store and was made by an Italian producer. 

 There are a lot of steps to this recipe although it does allow you to prepare steps ahead of time for your convenience. Making this trifle felt like quite a laborious activity with mediocre results (in my experience), but I must say that when I was poaching the pears in all of the spices, my kitchen had never smelled so good! 

Friday, October 18, 2013

V: Vanilla Cheesecake Crunch-Top Cupcakes


Letter 'V'! We are getting very close to the end of the alphabet and these cupcakes from Cupcakes! by Elinor Klivans are a great way to celebrate prematurely. They are comprised of a simple yellow cake batter, covered with a layer of cheesecake and then some crumbly goodness on top--a party in your mouth. With all of their layers there are several steps involved in the cupcakes' baking process, but generally this is a pretty simple recipe to follow. The gold cupcake liners I used are part of my ever growing collection (I CAN'T stop buying them). They give the cakes a very festive look--a glass (or two) of champagne would be a great accompaniment!

Tuesday, August 6, 2013

U: Upside-Down Pineapple Cake


For the last Super Bowl I whipped up this upside-down pineapple cake from The Williams-Sonoma Baking Book: Essential Recipes for Today's Home Baker. It is an old American classic so I thought it would be an appropriate choice for the occasion. For those like me who occasionally attend Super Bowl parties without understanding any of the rules of American football, you must make sure that you are armed with lots of snacks in order to make the evening as enjoyable as possible.  This tasty little number seemed to do the trick and was so easy to make!

Tuesday, March 19, 2013

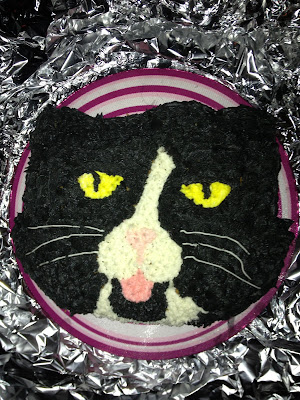
Cat Cakes: Arthur


I just wanted to share a picture of a cake I recently baked. It is of my old coworker's cat, Arthur, which I made for her goodbye party last week.  Arthur the Cake was a banana cake with bits of dark chocolate.  His fur was made from a stiff cream cheese icing.  My coworker was so moved by Arthur the Cake's resemblance to Arthur the Cat that she was unable to bring herself to slicing up and distributing the cake that night.  I did not have a chance to taste the cake myself but later reviews from my coworker and her boyfriend were very positive. Arthur the Cat did not comment. 

In order to make Arthur, I bought a Hello Kitty cake pan from my local Bulk Barn store.  I needed to do some reshaping once the cake had baked and cooled.  I cut away the Hello Kitty bow, restructured the sides of the face, and re-positioned the facial features once I started decorating.


In order to justify my purchase of the pan I am thinking that "Cat Cakes" might  become a regular thing and potentially a new segment on this blog...so, to all my friends and family members who are cat owners...BEWARE!

Thursday, June 23, 2011

O: Orange and Poppy Seed Cake


Before I begin talking about food I'll just share the low-down of what I've been up to this past week. I ended my European adventure and got back to Canada on June 15th. The weather was beautiful, it was so nice to catch up with everyone, and I found I had developed a greater appreciation for Toronto. I was there for a few days before leaving again on the 21st to fly to Buenos Aires in Argentina. I have some family here and I also met up with my friend Brigid who has recently been doing a bit of travelling of her own. For just over a month Brigid and I will be visiting a few different places in South America--where we will be going still needs to be determined...

I have always wanted to travel to South America so it is great being in Argentina now although it is their winter and the weather is a bit sad. Brigid and I are taking a couple of days to get over our jet lag (I have no excuse because it is just an hour ahead here but she just came from Australia) and to finally create a rough plan of where we want to visit. I thought I would take advantage of this time of rest to complete the blog post I started just before I left for the airport on Tuesday.

When I was in high school my mother used to always buy issues of the BBC Good Food magazine. They were one of my favourite magazines to flip through (food geek) and my mum now has a couple of folders with clippings of some of our favourite recipes. This orange and poppyseed cake is one of the really good ones we have in there.

The Saturday I was back in town, my sister invited us over to her place for a barbeque (scrolll down to see pictures of her lovley table decor and her cute pup, Olive) and I thought I would make this cake to bring for dessert. I find that oranges are usually featured in more wintry dishes (their season tends to end in April), but with the custard and citrusy notes, I think this recipe works quite well for a summer barbeque. 

Here are some of my notes:
1) Try to cut the oranges as thinly as possible. The orange slices that I featured on top of the cake were quite thick.  Because of their thickness they were less likely to fall apart while being poached and therefore were more attractive. However, the thicker density was manageable but also on the boarder of being 'too much' when it came to eating them.
2) The recipe calls for a 20 cm pan which is approximately 8 inches. I used a 9 inch spring-form pan because that's what we had. It was fine but using the smaller size would have been a bit better because the cake would have been taller and therefore easier to slice into three (and I think it would have been prettier). The recipe doesn't make a whole lot of the custard filling so if you have a smaller area to cover you can also put it on more liberally.  
3) There are quite a few steps to making this cake (baking the cake, making the custard, poaching the oranges, waiting for everything to cool, etc) so it's good to give yourself at least a few hours to make it. You could easily subsitute making your own custard with one that is ready-made and just combine it with the citrus juices and zest. Also the cake would probably benefit from being made the day before and being chilled overnight because that would allow for all the flavours to blend into one another. All in all it is such a delicious and really flavourful cake!

Since I am on the road again until the end of July, this is probably the last post I will be able to put up for a while.  I promise to take lots of pictures of my travels in South America and will put them on here once I return to Canada. Until then, hope you enjoy the photos and even the cake if you get a chance to make it!

Monday, June 20, 2011

N: Nut Cake


As much as I love posting all of my travel photos (there are still a few more to come), it is about time I get back to the original theme of this blog.  I made this nut cake on May 15th which was my last day in Edinburgh before leaving to Portugal. I made it in between all the sorting, packing, and saying my goodbyes so it was vital that the recipe for letter 'N' was quick and painless. This is one of my mother's recipes and with only three ingredients (nuts, eggs, and sweetened condensed milk) it is so easy to execute but still extremely tasty.

The cake has an almost custardy texture and it pairs really well with ice cream (generally vanilla). Most kinds of nuts can be used in this recipe but my mother's recommendations are either almonds or pecans because of their flavour. I decided to go with pecans this time because I didn't have a food processor and I thought they would be easier to chop up.  One probably could use a bag of already ground almonds but then again they might be too fine... Anyways, if you're having a moment where you are feeling a little too preoccupied to do any baking, it doesn't matter, start making this cake!!! :-)